Indoor Cycling Handlebar Comparison: Find Your Fit
By Hyejin Park • 15th Feb
Choosing the right exercise bike handlebar type shapes everything about your home ride, from comfort and power output to how consistently you'll actually show up. Your handlebars determine contact point, upper-body posture, and whether multiple household members can quickly swap and ride the same bike without frustration. If your household includes many riders, our large-family bike comparison breaks down the fastest adjustment systems and profile tools. I've learned that fit range and micro-adjustability matter far more than any headline spec.
Why Handlebar Choice Matters for Your Home Setup
Indoor cycling handlebar comparison often focuses on aesthetics or brand marketing, but the real story is biomechanics. Your hands, shoulders, wrists, and core all adapt to the bar's shape, reach, and drop. A poor match leads to hand numbness, shoulder tension, or lower-back fatigue, and when discomfort enters the picture, consistency disappears. To fix common pain points fast, follow our proper exercise bike posture guide.
Unlike a gym or studio where you visit once and tolerate temporary awkwardness, home cycling demands gear that fits your body and household from day one. I once hosted a family of five on a single bike to test adjustability (riders from 4'11" to 6'3"). If you're 6'2"+ or have long arms, see our best bikes for tall riders for reach-friendly options. We timed bar and saddle swaps, logged knee angles, and marked adjustment posts with tape. The youngest beat the changeover time. Watching comfort unlock consistency convinced me that fit range matters more than any headline watt number. Small tweaks, big wins.
The handlebar you select dictates how easily that adjustability happens.
The Core Handlebar Types Explained
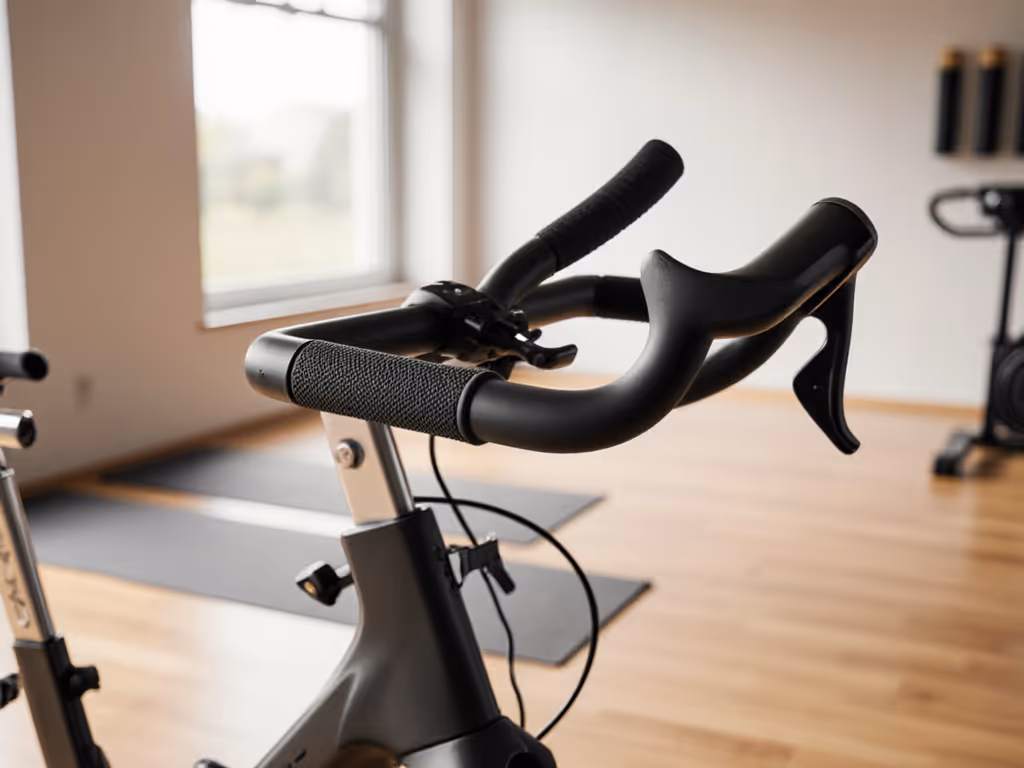
Drop Bars: Multiple Positions, Higher Skill Curve
Design overview: A curved bar that offers at least three hand positions: the hoods (top curve), the hooks (lower section), and the straight bar section in between.
How they work: Drop bars let riders shift hand position during a workout, reducing fatigue and accommodating different power demands. Lower positions increase aerodynamic efficiency; upper positions boost comfort and visibility.[1]
Best for: Riders seeking aerodynamic efficiency and long indoor sessions where hand-position variety matters. Cyclists coming from road bikes often feel at home here.
Fit considerations:
- Reach: Distance from stem to bar end. Measured in millimeters; typical road-bike drops range 70-90 mm.[2]
- Drop: Vertical distance from hood to hook. Shallow drops (100-120 mm) suit more casual riders; deeper drops (140 mm+) appeal to aggressive riders but demand more spinal flexibility.[1]
- Width: Shoulder width is the starting point. Most road drops come in 38-44 cm; compact models go narrower.[2]
Adjustment range: Drop bars offer versatility once installed, but changing reach or drop requires buying a new bar. They don't micro-adjust vertically or horizontally on the stem.
Comfort reality: If your reach is wrong, you'll feel it in your wrists and shoulders within 15 minutes. A few millimeters of stem length or bar reach matter hugely.
Flat Bars: Upright, Accessible, Limited Evolution
Design overview: A simple horizontal bar, sometimes with a slight sweep (angle) backward or a small rise upward.
How they work: Flat bars place your hands directly above the stem, creating an upright torso position. Minimal learning curve; intuitive hand grip.
Best for: Beginners, short indoor intervals, and riders prioritizing comfort over aero gain. Also common on hybrid and fitness bikes.
Fit considerations:
- Width: Typically 58-72 cm indoors; broader bars improve stability and shoulder positioning.[3]
- Sweep: A 5-15° backward angle reduces wrist strain by bringing hands closer to your body.
- Rise: Some flat bars angle upward slightly; this reduces reach and lowers spinal stress.
Adjustment range: Flat bars offer single-axis positioning. Once clamped, they don't offer in-ride position variety.
Comfort reality: An upright bar is forgiving for casual rides and multi-user households where fit tolerance is high. The trade-off: you sacrifice aerodynamic positioning and can't shift load between hand zones during intense efforts.
Compact Drop Bars: The Middle Ground
Design overview: A drop bar with shallower drop (100-125 mm) and shorter reach (80-90 mm), blending road efficiency with everyday comfort.[1]
How they work: Compact drops deliver multiple hand positions without forcing an extreme forward lean. More accessible than classic drops; less forgiving than flat bars.
Best for: Riders mixing serious efforts with comfort, or households where multiple riders want drops but have varying flexibility or cycling experience.
Fit considerations:
- Reach: Typically 80-90 mm; verify your torso length and arm span before committing.[2]
- Drop: 100-120 mm; allows hookup riding without extreme spinal flexion.
- Flare: Some compact drops flare outward at the hooks (4-6°), reducing wrist strain and broadening grip options.[2]
Adjustment range: Like classic drops, reach and drop are fixed. The shallower geometry means position variety is less dramatic but remains meaningful.
Comfort reality: Compact drops work well in households with a 5-6 inch height spread and mixed fitness levels. The learning curve is gentler than classic drops, yet still rewards multiple grip positions.
Bullhorn/Pursuit Bars: Aggressive, Limited Comfort Range
Design overview: A straight bar with curved, forward-pointing extensions (horns). Sometimes one step below a classic drop in aggressiveness.[1]
How they work: Bullhorns position your hands forward and slightly higher than drop-bar hooks. Excellent for sprinting and climbing power; single dominant hand position.
Best for: Time-trial enthusiasts, aggressive urban riders, and single-user setups where one fit is the goal.
Fit considerations:
- Extension length: Typically 18-24 cm forward; longer reaches suit taller riders.[3]
- Height: Most bullhorns sit higher than drop-bar drops, reducing spinal load compared to extreme aero bars.
- Brake lever placement: Often on the straight section or at horn ends; practice positioning before buying.
Adjustment range: Bullhorns lock you into a single powerful position. No mid-ride shifting. Multi-user scenarios demand re-setup.
Comfort reality: Bullhorns excel if you're solo and know what you want. They're less forgiving in a shared household or if your ideal power position shifts week to week.
Riser Bars: Comfort-First, Stability-Focused
Design overview: A flat bar angled upward, often combined with a modest backward sweep. Maximum upright posture.[1]
How they work: Riser bars lift your hands and reduce reach dramatically, placing your shoulders over your hands and your core more vertical. Shock absorption is higher; spinal stress is lower.
Best for: Casual riders, recovery weeks, multi-user households with extreme height variation, and riders prioritizing joint health and vibration dampening.
Fit considerations:
- Rise angle: Typically 15-30° upward; steeper = more upright, but can feel awkward if too aggressive.[1]
- Sweep: 5-15° backward helps wrist angle and feels more natural than a bar that points forward.[1]
- Width: Usually 58-72 cm, matching flat bars.[3]
Adjustment range: Like flat bars, riser bars offer a fixed single position once installed.
Comfort reality: Risers are forgiving. They're ideal if your household spans a big age or fitness range, or if you're rebuilding confidence after injury. The trade-off is aerodynamic efficiency and hand-position variety.
Step-by-Step: Finding Your Fit
Step 1: Know Your Body Dimensions
Before comparing bars, collect three key measurements:
-
Torso length: Sit upright against a wall; measure from the top of your head to your tailbone. Divide by your height to get your sitting ratio. Riders with a longer torso (>0.55 ratio) often prefer longer reach; shorter torsos benefit from compact reach.
-
Shoulder width: Measure bone-to-bone across your shoulders at their widest. This is your baseline for bar width. Women often have narrower shoulders and shorter reach; here are women's fit tips to avoid overreaching. Most riders prefer bars 2-4 cm wider than shoulder width for stability.
-
Forearm + hand length: Sit with elbows at 90°, palms down. Measure from elbow crease to fingertip. This informs drop-bar reach and bullhorn extension length.
Step 2: List Your Non-Negotiables
Ask yourself:
- Solo or multi-user? If more than one household member rides, prioritize bars offering multiple adjustment points (seat height, stem length, bar tilt) so swaps don't require new hardware.
- Ride duration: 20-minute bursts tolerate less ergonomic bars than 60-minute sessions.
- Ride intensity: Sprinting and hard climbing demand more forward/aggressive positioning; recovery and zone-2 work favor upright bars.
- Wrist or shoulder history? Upright bars and riser bars reduce stress; drop bars add stress if reach is wrong.
- Noise and vibration sensitivity? Flat bars and risers typically transfer less vibration to your shoulders than aggressive drop-bar positioning.
Step 3: Test in Context
If possible, visit a local bike shop or studio and sit on several bar types in the positions you'd actually use at home:
- On the hood/upper section (for drop bars): Relaxed, conversational position. Your elbows should be slightly bent, not locked or sharply flexed.
- On the drops/lower section (for drop bars and pursuits): More aggressive. Your wrists should be neutral (not bent downward or pinched), and your shoulders relaxed even though forward.
- On flat bars and risers: Your shoulders should sit directly above your wrists with minimal reach. Elbows at 90° are the benchmark.
Spend 5 minutes in each position. Discomfort that arrives after 20 minutes at home is a red flag.
Step 4: Factor in Micro-Adjustability
Once you choose a bar type, ensure your bike's stem and clamp system allow micro-tweaks:
- Stem length: A 10 mm difference in stem length shifts your reach significantly. Shorter stems suit compact riders; longer stems suit riders with longer arms.[2]
- Stem angle: Adjustable stems let you tilt the bar up or down by 15-30°, offsetting reach or drop mismatches.
- Seat fore/aft: Sliding your saddle forward or backward on its rails shifts your weight distribution and reduces or increases pressure on your hands.
Small tweaks, big wins. A 15 mm stem swap or a forward saddle nudge often resolves hand numbness or wrist pain. For a full checklist on seat height, fore/aft, and stem tilt, see our exercise bike setup guide.
Step 5: Multi-User Setup Checklist
If your household has multiple riders:
Mark adjustment zones: Use tape or a marker to note saddle position, seat height, and stem tilt for each regular user. Label them (e.g., "Alex," "Parent 1," "Morgan").
Document measurements: Log seat height (measure from center of crank to top of saddle), seat fore/aft position (measure from the nose of the saddle to the center of the steering tube), and stem length in a simple spreadsheet or photo.
Time swaps: Before committing to a bar, practice changing settings. If changeover takes more than 3 minutes and requires tools, consider a different setup or invest in quick-release components (e.g., a dropper seatpost).
Cross-check comfort: Have each user ride 10 minutes and note any numbness, tingling, or pinching. These signals indicate reach, drop, or width misalignment and should drive bar selection or micro-adjustments.
Handlebar Ergonomics Cycling: The Technical Reality
Contact-point pressure: Drop bars and bullhorns concentrate weight on a narrower area, increasing pressure. Flat and riser bars distribute pressure over a wider zone.[3] For extended sessions or riders with hand-health issues, broader contact and upright positioning reduce pressure peaks.
Aero bar performance benefits are real but marginal for most home cyclists: A lower bar position can reduce aerodynamic drag by 5-10%, translating to a 1-3% speed gain at moderate power levels.[1][4] The comfort cost (wrist strain, neck tension, reduced visibility) often outweighs the aero gain unless you're regularly riding hard intervals and have the flexibility to match.
Reach and drop interaction: A long reach combined with a deep drop can force your wrists into acute angles (past 90°), triggering carpal-tunnel-like numbness. Conversely, a short reach with an extreme drop can feel cramped and limit power transfer. The sweet spot balances reach, drop, and your unique body geometry.
Actionable Next Step: Choose and Test Your Bar
Now that you understand the types and fit principles, make your move:
-
Identify your bar type priority: Solo and aggressive? Drop bars. Multi-user and comfort-forward? Flat or riser bars. Somewhere in between? Compact drops.
-
Source your bar: Order or test-fit a model that matches your dimensions (width, reach, drop) and your household profile. Ask the seller about return policies (30 days is fair).
-
Install and dial in: Once your bar arrives, install it, then immediately adjust seat height, seat fore/aft, and stem tilt using the measurements you documented in Step 1. Spend 2-3 rides dialing micro-adjustments (5 mm at a time).
-
Log comfort signals: After each ride, note any hand tingling, shoulder pinching, wrist pain, or neck strain. These are data. Use them to fine-tune positioning or confirm that your bar choice is right.
-
Share settings with co-riders: If multiple people ride, update your adjustment checklist after each person's maiden ride. This shared library becomes your multi-user playbook.
Comfort and adjustability are performance multipliers at home. Invest the time in fit now, and you'll harvest consistency, adherence, and real power for months to come.
Related Articles